 This summer, the Summer of 2010, will stand as the Summer of the Basement for the Dekker family. After three years in our home, we decided to reclaim our dusty, bumpy-floored, paint-peeling, slightly-leaky, 92-year-old basement. We knew we couldn't completely remake the room without $8000 and a contractor willing to jackhammer the floor, but we decided to do everything we could to make it work for us.
 This first set of pictures are all the before pics. Notice the fading yellow paint, the piles of stuff...
 ...the giant hole in the wall (leading into the crawl space under our kitchen)...
 ...more stuff and faded paint...
 ...bare lightbulbs with pull strings, the old lead sink, unnecessary furniture.
 And then there was the ceiling. Originally the ceiling was covered with the old lathe and plaster - standard for the time period. But over the years, as subsequent owners added duct work, electricity, and the like, everyone hacked and tore out pieces of it.
 This left a tangled web of wires, duct work, and unused gas pipes.
 Plus the miscellaneous cold air return duct here and there.
 Step 1: demolition. A group of friends joined us with hammers, screwdrivers, and reciprocating saws. We didn't get enough pictures to really capture the filthy mess we created. Mostly because we were so covered in dust and grime that we didn't want to touch the camera.
 As we pulled down the old ceiling, we found decades of a grimy dust piled up. This is presumably left from years of gas heating and lamps.
 This picture of our brother-in-law Chip captures the mess. The dust just coated us.
 As we pulled the ceiling down, we got to see the beautiful floor joists. The room felt bigger just opening the ceiling up. Other things we did (not pictured): pulled out old wooden shelves from the fruit cellar, yanked out unused nails and screws from the wall, removed disconnected gas lines, pulled out an old set of phone lines and connections, and took out unnecessary cold air return ducts.
 And then, slowly, the rebuild process started.
 First steps included hauling loads and loads of rubble out of the basement. (In the meantime, everything that normally resided in basement was stacked in the garage.)
 We scrubbed the walls and floors with trisodium phosphate. We secured ductwork, tied back cords, vacuumed and wiped down the floor joists.
 We pulled lots of unnecessary wires, pipes, and ducts.
 One of our biggest mini-projects (and proudest successes) was the hole in the wall.
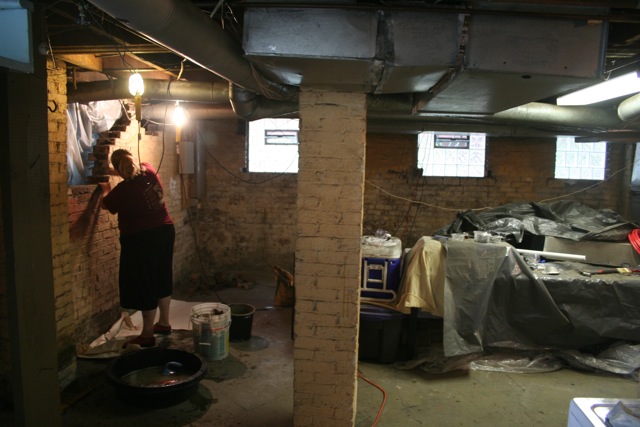 Beth armed herself with mortar and a stack of bricks we found around the basement and in the garage, and set to work.
 And voila! In addition to fixing the wall, she filled in missing bricks underneath many of the windows.
 And then, using lumber we found in the garage, plus a couple finicky masonry drill bits, we framed out the hole, built a door, hung it, and spray foamed the gaps. It was a beautiful, beautiful thing.
 Meanwhile, we started out painting. A friend loaned us a paint sprayer, which turned out to be an absolute God-send. It was the only way to successfully paint a ceiling full of wires and bumpy brick walls, and it really saved us untold time and stress. We painted the ceiling a charcoal gray - we found the paint randomly in the boneyard of a nearby Lowe's. The price: $30. And the color was perfect.
There aren't any pictures of the wall painting in progress, unfortunately. We discovered that, after hitting the front wall with the TSP, we were getting some bigger leaks with the heavy rains. Nick patched up the big holes with hydraulic cement, and then positively coated the lower walls (beneath ground level) with Drylock. It's a paint mixed with cement, so that it forms a sealing coat on the wall. All of the walls were painted a whitish-beige, concocted out of the 5+ gallons of miscellaneous white-ish paint we found in the basement.
 In the final stages, our friend Ben - a professional plumber - generously donated his talents in moving some water lines, installing a new utility sink (see above - $35 on Craigslist!), and extending the water lines so that we could move the washer and dryer. Ben did everything with commercial grade quality and materials.
 Once Ben was done, Beth and our friend Karl went through and installed can lighting. This eliminated most of our exposed bulbs and recessed the lights up in the floor joists.
 One of our last problems was the old lead sink. When Ben moved it to install the new sink, we found that its frame was nearly rusted away (see below):
 This is very dangerous, considering that the sink weighed almost 500 pounds. We couldn't give it away on Craigslist, the city probably wouldn't haul it, and we just didn't have the manpower to move it safely. Fortunately...
 ...our sledgehammer offered a simpler solution. The sink crumbled pretty easily, and we carried it out in buckets.
And that's the journey so far! Tune in soon for the stunning completion of our basement!
1 comment:
I consider bricking up a basement wall to be one of the creepiest things in the world. (Thank you, Mr. Poe.) Anyway, I felt a bit unsettled to see that picture of Beth.
Post a Comment